Configuring Environment for Secure Label
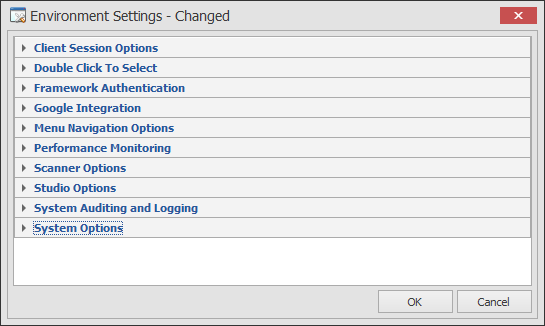
Configure System Environment
Configure System Environment – Client Session Options
A Client Inactivity Timeout (min) of 30 minutes is set for network data collection devices (i.e., no activity at the device for 30 minutes will cause the device to be logged off). This setting may be modified as desired.
A Session Shutdown Delay (sec) of 120 seconds waits an additional 2 minutes after the mobile device sends the “disconnect” command, before ‘releasing’ the session. Sometimes a mobile device will terminate a session and reboot, but the user’s intention is to reconnect and keep working.
Configure System Environment – Double Click to Select
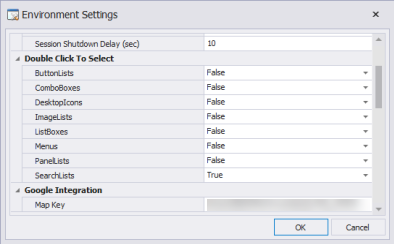
The following controls need to be configured if you want to require a double click to select an item and trigger the OnEnter event. Otherwise a single click will select and trigger the OnEnter event. This behavior is the same as previous version option “Require Double Click to Select Lists” but has been expanded to allow the behavior to be specified by control type (i.e. Menus are single click, ListBoxes need a double tap.)

The Framework Authentication group includes these settings:
-
Authentication Type
AUTHENTICATION TYPES
Use this feature to select which service provider shall be used for authentication of user logins coming from the users of RFgen mobile clients. The options are: - RFgen, Active Directory Groups, or SSO Services.
If you want RFgen to handle user logins, the validations will be based on the credentials under the Solution Explorer > Users group. If RFgen Load Balancing services are configured, the user login validations will be handled automatically.
Authentication by Active Directory Groups
If you want your user logins managed by Microsoft Active Directory Groups, enter the name of the Active Directory Group for which the user is a member. You can enter a single or multiple Active Directory groups separated by a comma.
If you leave this field blank, then the user's login credentials will be authenticated against the Active Directory, but will not seek out the credentials against a specific group membership.
Default Menus. To access menus, the authenticated event in RFgen.bas has already been defined. Click on the down arrow to view and select the active menu that the user will have access to once his or her credentials are validated.
To script a Windows User (against an Active Directory Group or Active Directory Account, see the online help > Scripting or VBA Language Extensions and search on "Sys.ValidateWinUser".
If you select SSO, you will need to enter the URL of the server that is responsible for providing the user tokens. In this capacity, the Redirect URL will tell you if your login was complete. The SSO provider will return results; The token name will extract the token from the results based on the name provided in the Token Name field (see below).
Default Menu - In order for the user to access menus, select the menus that will be allowed in the Default Menu drop down list.
Token Name - The name of the token used to authenticate the credentials.
Require Login for Provisioning / Restrict (Device) Access for Provisioning
These settings restrict whether a DEVICE can be provisioned by the RFgen server.
When Require Login for Provisioning is True, the user must login and be authenticated before the client can be provisioned.
When Restrict Access for Provisioning is set to True, this will add a Allow Provision column to the Devices > Authorized Devices > Device List. In order for the server to provision the client, the RFgen Admin must check the Allow Provision box for the specific device listed in the Authorized Devices table.
You can choose the strictness by setting both to True or make it less restrictive if both were set to False. For example:
* If both are set to True then all client provisioning requests will be denied unless the user's credentials are accepted, and the device is known, and the "Allow Provision" box is checked in the Devices > Authorized Devices > Devices List.
* If Require Login for Provisioning is set to True and Restrict Access for Provisioning is set to False, the device request to be provisioned is accepted if the Device Authorization is disabled and the user login credentials are authenticated. But, if Device Authentication is enabled, the device must first be authorized and connected, the user must have a successful login before the device can be provisioned.
* If Require Login for Provisioning is set to False and Restrict Access for Provisioning is set to True, then provisioning will not occur until the Allow Provision box is checked in the Devices > Authorized Devices > Device List. Note that the if Restrict Access to Known Devices is set to True, these parameters will take precedence, before the device can be provisioned. For example, after a device has been authorized, the user must reconnect with the server, then to be provisioned, the user will request the provision, be rejected until the Allow Provision box is checked, and then the user must request to be provisioned again.
* If both are set to False then anyone with a Thin client can be provisioned once the user a valid connection with the RFgen server. For example, if Device Authorization is turned off, then the connected client can be provision. If Device Authorization is turned on, the parameters take precedence before the device can be provisioned.
Restrict Access to Known Devices
This feature automatically rejects all Thin client connection requests if it is set to True. An administrator will have to manually approve the device in the Authorized Devices screen and then the client will need to reattempt the connection before the device becomes Known to the RFgen server for future connections. To authorize a device, the administrator can check the box to make a device known in the Mobile Development Studio > Devices > Authorized Devices screen, or the Mobile Unity Platform Console > Device Authorizations screen.
Note: Batch, or Offline clients (clients with Mobile profile) require manual approval for connection in the Authorized Devices screen regardless of whether this feature is set to True or False.
Configure System Environment – Google Integration

If you create an application that uses the Google Map, Route Planning, or Google Geo-Location and Tagging Support functionality, an activation license key from Google is required. To learn more about obtaining an activation license key, go to the following URL and click on “Paid”.
https://developers.google.com/maps/pricing-and-plans/
and
https://developers.google.com/maps/documentation/javascript/adding-a-google-map
You will need to acquire an API key from Google and register your application in the Google API Console.
Note that the Map layout control in the Toolbox can be used to integrate the Google maps/Google GPS/Tagging Support into your application.
Configure System Environment – Menu Navigation Options
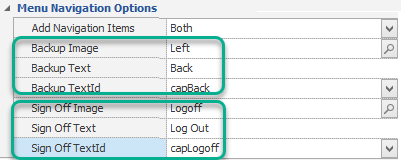
This sets the default for the two most common navigation actions: Backing up from one prompt to a previous prompt (or page), and logging out from a session.
Add Navigation Items - Both will display both the Backup and SignOff actions or choose the one you want to have appear, or display neither of them.
Backup Image and Sign Off Image link to the specific image file to be used.
Backup Text and Sign Off Text assign the name that will display.
Backup TextId and Sign Off TextID are assigned to the Text Resource Id for translation purposes. This can be left blank if its not used.
Configure System Environment – Performance Monitoring
If specific connectors are taking too long to process a request, these properties can be configured to capture processing requests that take over a certain amount of time. Set the property to zero to disable. Some connections usually take longer than others. For example, the database execution time will usually be significantly faster than a screen mapping connection or a Web Service connection which may be especially slower. Setting all the properties to the same number would not be appropriate.
To use these options, you'll need to configure a transaction management database. The following settings are all in milliseconds except for Log System Usage Statistics. The Log System Usage Statistics values are Disabled or can be set to record system statistics in 15, 30, and 60-minute intervals.
- Log Database Execution Over (msec)
- Log ERP Execution Over (msec)
- Log Legacy Host Execution Over (msec)
- Log Script Execution Over (msec)
- Log System Usage Statistics (min)
- Log Web Service Execution Over (msec)
Configure System Environment – Scanner Options
Scan for Pre-Amble and Post-Amble filter entries are character strings that are automatically sent from a scanner. They ‘surround’ the scanned data. They are optional and neither is required.
Common pre-ambles include a location number, or perhaps an operator number. Common post-ambles include control characters such as a tab or perhaps a carriage return-line feed. See your scanner documentation for information concerning how to establish these entries, or how to disable them.
Pre-amble and post-amble entries entered here are used by RFgen: (1) to identify scanner input, and/or (2) to automatically strip the pre/post entries from the character sequence received from a scanner. They will also cause a VBA Application ‘OnScan’ event to trigger.
Valid values are \n for new line, \r for return, \t for tab, \# where the # is any single character, and a group of characters like HELLO. If multiple characters are used then they are looked for as string text.
This configures the Snap-to-Grid and Screen Capture features. The Snap feature automatically spaces and places graphical controls so they are aligned with other controls on a form. The grid displays a horizontal and vertical lines to help you align objects left (or right) sides and horizontal alignment.
If Enable Screen Capture is set to True, the  icon which will display on the tool bar above the form in the Application Designer and in the App Test session screen. This allows you to capture your app in the design view or runtime view (Test). Once the image of the app (and its device skin if desired), the images are saved to your Windows Program Data \ RFgen 5.2 \ScreenCapture folder.
The Snap Active Distance controls the distance between the x and y values of the grid. (The value is in pixels.)
The Snap Enable turns the snap-to-grid function on/off. True = on; False=off.
Configure System Environment – System Auditing and Logging
The following are all methods for archiving the backend system and therefore can be logged if strict compliance to regulatory law is required. There are three modes, Disabled, Basic, and Extended. This simply refers to the level of detail provided in the log. The logging options include:
- Archive SQL Update Requests?
- Archive Stored Procedure Calls?
- Archive Transaction Executions?
- Days to Store Archived Data?